Since it is picnic season I thought I would introduce you to some of my favourite tasty morsels, which are perfect for the beach esky or may be to try a little Italian in the park
Italian cuisine has been prominent on our Australian menus and in our supermarkets for many years now. I remember back when some Aussies called it ‘wog food’ with the same bigotry and distaste that was used for us’ poofter/lezzo bastards’…thank goodness that times have changed….Italian people and their beautiful home grown delicacies are now deeply seeded within our culture just like the LGBIT Community is today.
Just as our own community it is diversely flavoured, so is the Italian cuisine more than just pizza and pasta.
Frittata IL forno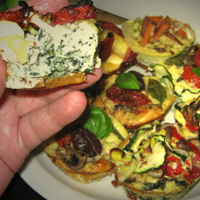
Over the decades, it has evolved and re-invented itself into so many shapes, styles and popular flavour combinations. In 2010 we call it Frittata or ‘Pastry-less Quiche ‘but it also has been known as an “Egg Combo “in the 1970’s .No matter what you want to call it, it is back in fashion because of its versatility and absence of gluten. All you have to do is pick your favourite ingredients.

The Frittata Mixture Makes about 12 muffin sized tarts
1 doz eggs
300 ml cream
Whisk until blended and only season the mixture, if you wish. There is no need to add salt if you are using cured meats or salty cheeses. If you get any stray bits of shell in the mix pass it through a fine sieve. I like to add cracked black pepper on top, the last thing before cooking, not only as flavouring but as a decorative effect.
METHOD
You will need a muffin tray…. Spray it liberally with cooking spray or oil, making sure that you get right into the corners. If you don’t have a muffin tray a deep sided tray will do and then after cooking you could cut it into squares.
Next for the Base….peel a sweet potato (or a normal potato; skin optional) and cut it into rounds to form the bases of each frittata. Boil until’ only just cooked ‘and drain and cool. Place them in each muffin well.
The Filling….fills the muffin well and think about which ingredient will be seen on top. Add shredded cheese, keeping it close to the bottom to avoid it over browning on top of the frittata. Add any fried meats, onions or any other ingredients that take your fancy.
Pour Frittata mixture over the ingredients evenly…Use a jug with a lip or a ladle and try to avoid making a mess with the mixture all over the tray. With your clean finger, prod each tart to remove any air bubbles and top up the well with more mixture until it’s full. if some of the ingredients rise above the top of the tray, don’t worry because they will level out during the cooking process.
Think about ….which ingredients may burn easily like semi dried tomatoes, fresh basil leaves and olives. I usually make sure these are covered properly with egg. I suggest putting the decorative things on top, such as asparagus, fresh cherry tomato rings or pepperoni slices, depending on which ingredients you like to include.
Bake in a slow oven…. about 180 C for 25-45 minutes. This will depend on volume heat control as to how long it will take. Try not to colour the top too quickly .Pale yellow is the desired colour (not too brown). When cooked it will be firm to touch and slightly risen. If you are making a deep version, in a cake tin, make sure the centre is not too runny by testing with a squewer.
If making mini tarts….allow the frittata to cool in the tray completely before running a paring knife around each one. Carefully remove them with a flat palette knife. Serve either cold, warm or reheated for finger food occasions, breakfast or luncheon.
SECRET CHEF BUSINESS
From a chef’s point of view, frittata is the perfect way to rotate scrambled egg mixture and other ingredients to avoid wastage. I personally am suspect of any frittata that I have not made myself because I know that there is a very real possibility that some chefs may use up sub-standard ingredients. I assure you that after you make your own frittata, you will realize how simple and delicious it is make and there will be no need for you to ever buy it again!.
Think about the flavours of your particular ingredients and imagine how they will go together. With things like bacon, onion, mushroom, and chicken it helps to lightly fry them first to bring out the flavours.
Arancini CON FORMAGGIO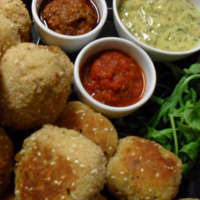
These Cheesy, Italian Risotto balls are just the thing to hit the spot at lunch or even on a picnic served cold. They have always been hugely popular with patrons at the cafes in my area because of their simple flavour and their ability to heat up quickly in a microwave for speedy service. They are lovely served with a light salad and a great option for vegetarians at finger-food and cocktail functions.
If cheese and chive isn’t your thing, the recipe is easily adapted for carnivores by adding tuna, smoked salmon, chicken or bacon. You are only limited by your creativity. Freshly made pesto or herb aioli is a great accompaniment but if you wish, store bought basilico pasta sauce, roast pepper and/or semi dried tomato tapenade will excite your tastebuds with authentic flavours just as well.
Makes about 15 balls (or 30 bite sized cocktail balls).
INGREDIENTS
½ a chopped brown onion
500g (1/2 pack) Arborio rice
¼ cup vegetable, peanut or canola oil for frying
Another ¼ cup of oil for the baking
2 tsp vegetable stock powder (or chicken)
800 mls of hot water (approximately)
100g (or ¾ cup) of light shredded tasty cheese (reduced fat)
125 g of extra light ricotta (or full fat)
30g (1/3 of a pack) grated parmesan (add extra for sharper flavour)
1 bunch of fresh chives (fine sliced)
A little black pepper
CRUMBING STATION
1 cup of plain flour (or gluten free, rice flour or cornflour)
2 eggs and 500ml of milk
250 g breadcrumbs
40g sesame seeds (add more for extra speckled effect)
1 tbs grated parmesan
METHOD
Fry the onion and rice together in a deep non-stick fry pan or heavy bottomed pot, until the grains become a little translucent and the onion begins to brown. Stir continuously with a wooden spoon to avoid burning.
Add the hot water and stock powder. Turn down the heat and simmer until all the water is absorbed and the rice is ‘al dente’ translation: to the teeth.
Allow the rice to cool completely. Add the rest of the ingredients (except for the crumbing station) and mix well.
You will need a tray and a bowl of clean water to re-wet your hands as needed…. Roll the rice mixture in the cupped palm of your hands. The water will help stop it from sticking to your hands. Be careful not to press too hard .When all the mixture is rolled into balls put the tray in the fridge, for at least an hour or overnight to firm up.
Set up your crumbing station into 3 bowls…flour, egg-wash and crumb mixture (sesame/parmesan). Dip the balls one at a time into the flour first, then the egg-wash and finally the crumb mixture. Try to keep one hand for wet and the other for dry to avoid getting messy lumps in your crumbs.
Place the Arancini balls on a baking tray with a lip . Sprinkle lightly with more oil (or spray from a can). Bake @ 250 C / 500 F for about 25 minutes or until golden.
Herbed Aioli dipping sauce… (Makes a small cup)
Aioli is traditional garlic mayo but i prefer to make my own herbed versions without garlic. You may also exchange the chopped herbs for pesto to make yet another variation. If you are feeling less adventurous you may also consider buying a premade jar of pesto or tapenade.
INGREDIENTS
1 egg yolk
¾ cup of oil
1 tsp Dijon mustard
Squeeze of ½ a lemon
½ tsp chopped basil
½ tsp chopped parsley
1 tsp mixed herbs
(Dill optional)
METHOD
In a large bowl, whisk egg yolk and mustard until thick.
Add oil very slowly by drizzling it in while you whisk. If you add too fast it will separate.
Mix in the herbs and lemon juice. Taste to see if seasoning is needed. Serve in a nice little bowl.
Steve Anderssen
***


